
If you're hosting a dinner party like Friendsgiving, it's time to start thinking about a tablescape to create the right atmosphere for your meal. Do you want to have a centerpiece? A table runner? Place cards? There are quite a few different directions to take a tablescape, from a casual dinner to formal meal settings (which fork do I use first?!), here are a few tips from some of my favorite experts on how to make an impactful table that will make your guests think you're the next Martha Stewart!

FLOWERS
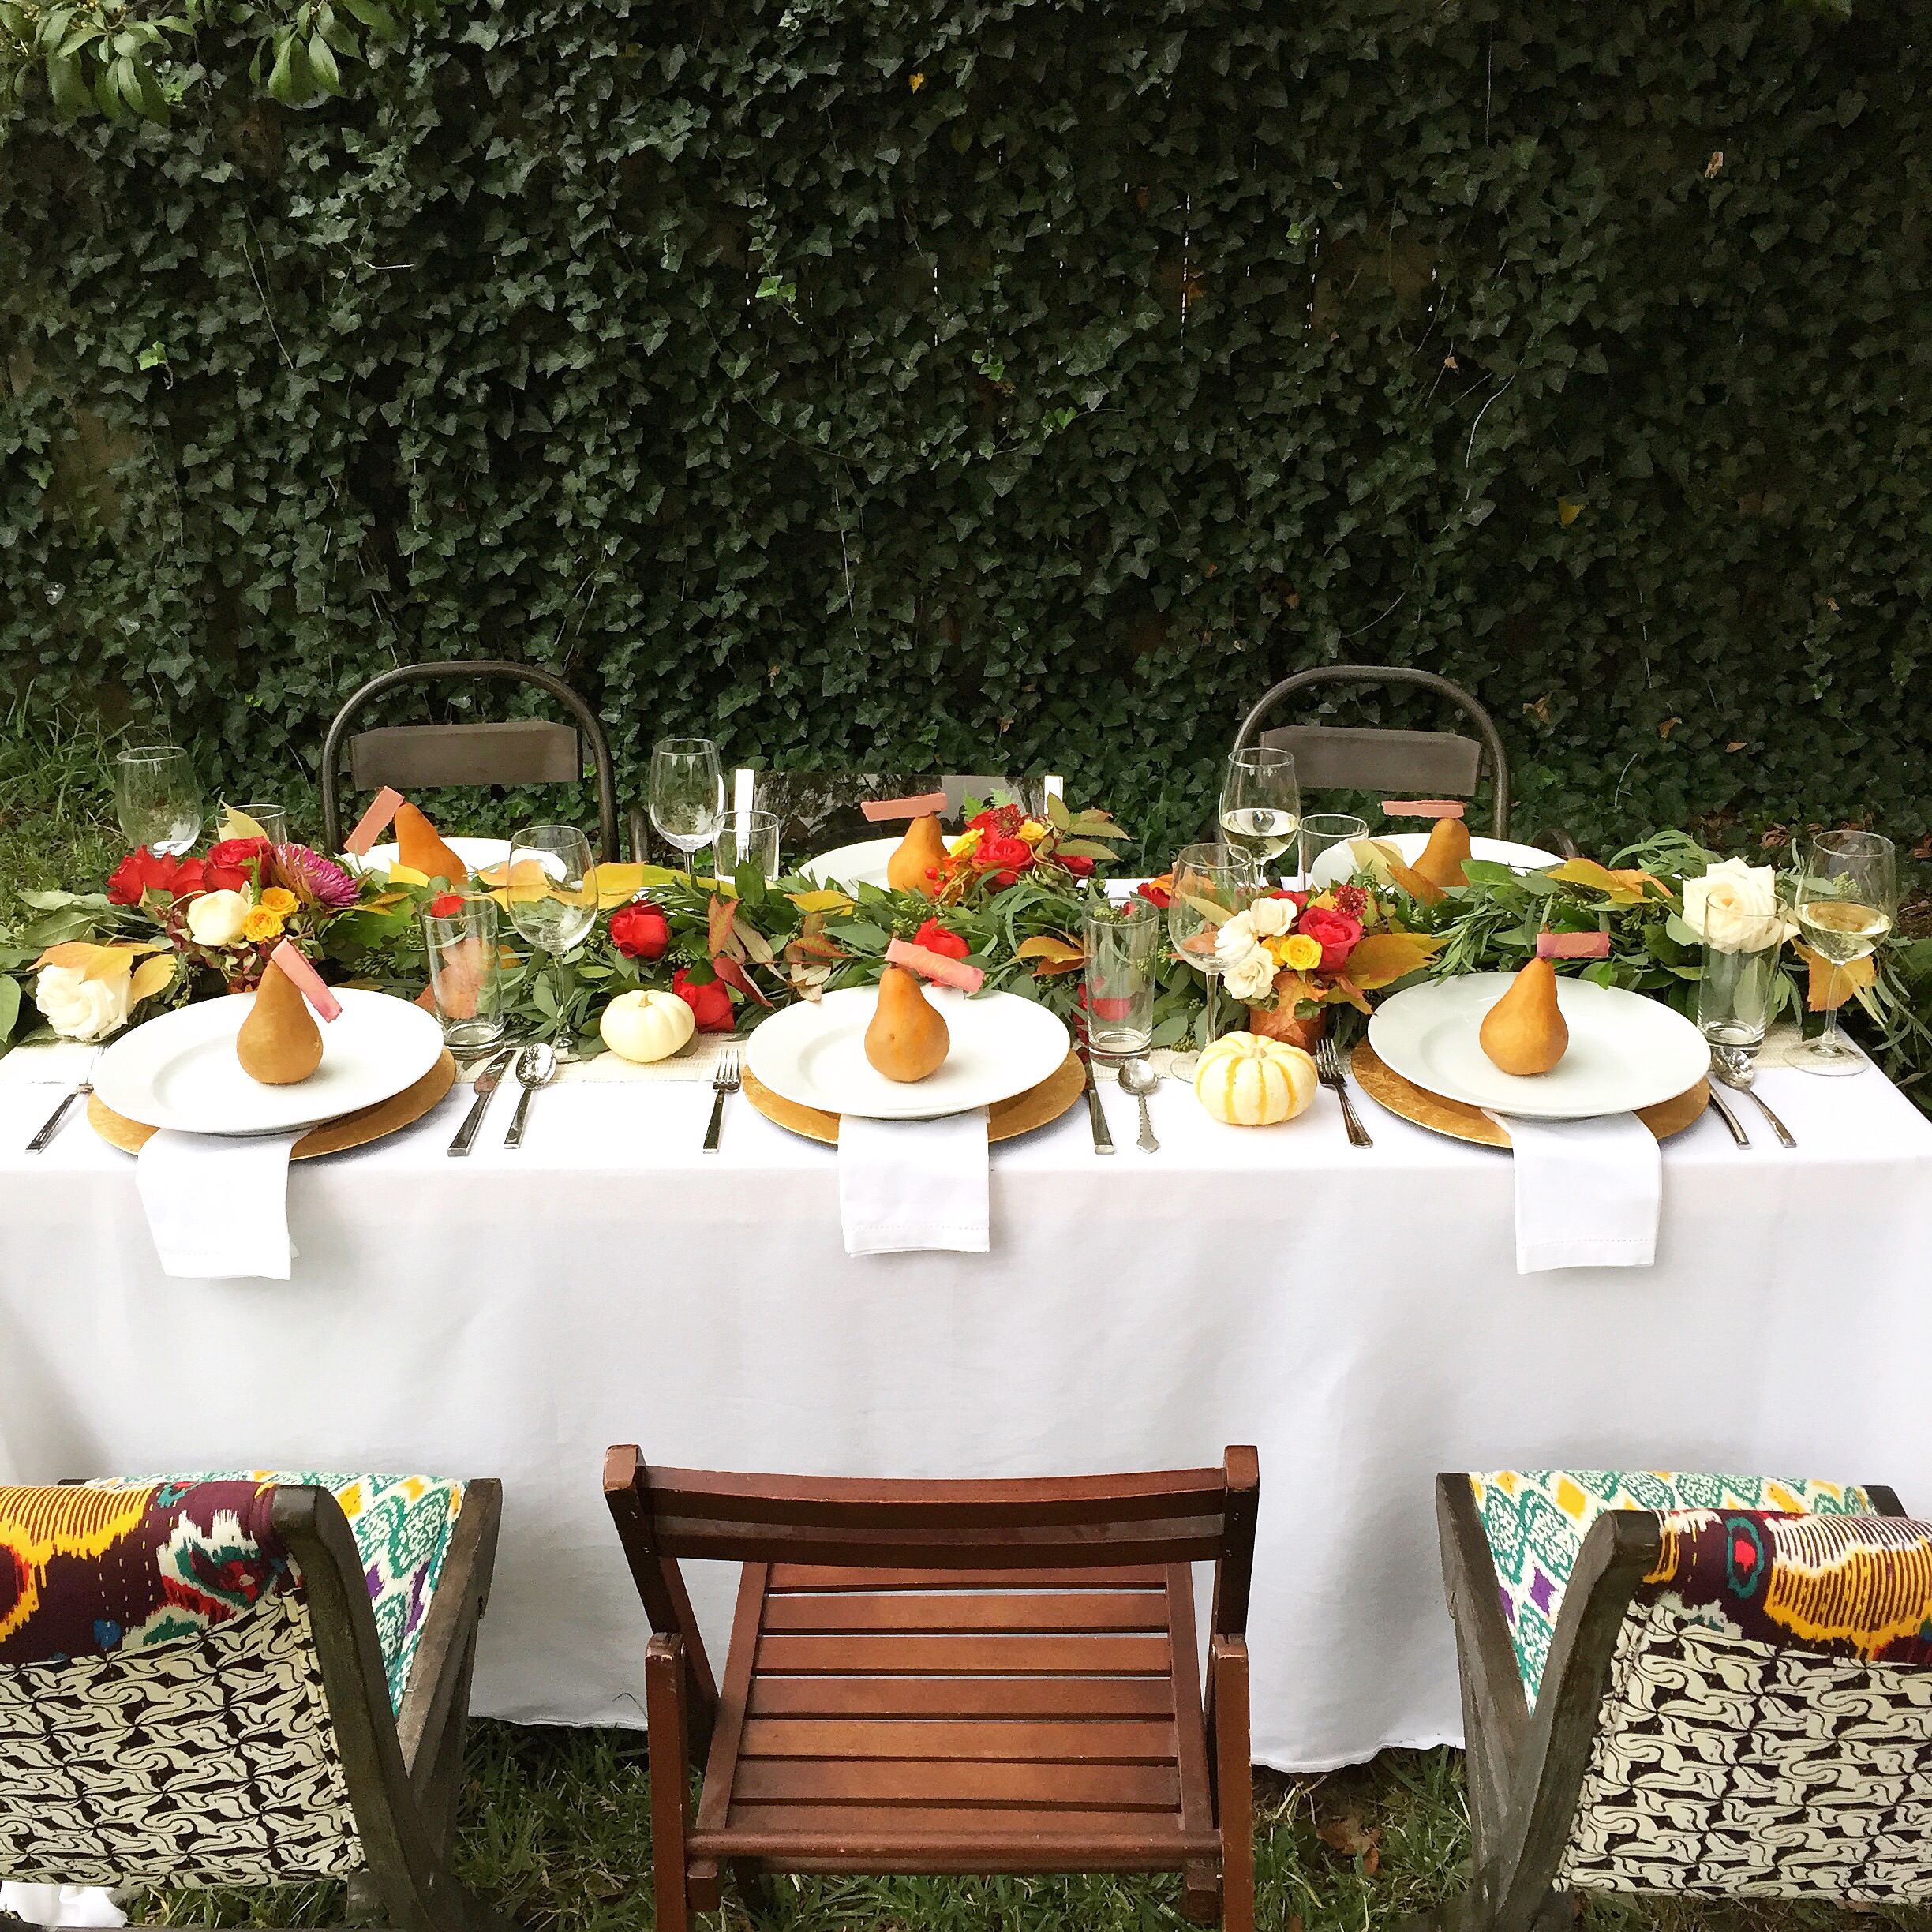
Floral arrangements are usually one of my favorite aspects of any event, so I asked my friend and talented floral designer, Raquel, of R. Love Floral to partner with me to create a unique Friendsgiving centerpiece. We started with a table runner on top of a white tablecloth as the base of our centerpiece; then we added a long greenery garland made of eucalyptus and assorted leaves.

Instead of placing the garland on the table in a straight line we opted to give it a little movement to create a less then perfect table runner. If you don't want to purchase a premade fresh garland, you can also forage for leaves in your yard or a greenbelt near you; instead of creating one long garland of greenery with wire, you can simply overlap each piece/branch on the table to create a more rustic look. If you want to create a simple and relaxed atmosphere, you could simple add a few candles around the greenery.
Raquel gave me an excellent tip, especially if you are on a budget or want to have something that you can reuse each year; she said "A faux Christmas garland can instantly make a stunning Thanksgiving table runner by adding burgundy roses, fall leaves, and pumpkins. Insert the blooms directly into the garland and style as you please. If you wish to make your garland early and use fresh flowers, just water tube (found a local craft store) your roses and blooms so they stay hydrated during the week."
Our next step was to add loose flowers and foraged fall leaves into the garland to create a seasonally appropriate arrangement; yellow leaves along with red and white roses turn a plain garland into a seasonal centerpiece. Raquel mentioned that dried leaves are her favorite thing to decorate with in the fall! "They make any centerpiece or tablescape automatically feel so fall-like."
According to Raquel, "When you are purchasing flowers for your centerpieces make sure to get big blooms like roses, hydrangeas, sunflowers, as well as smaller blooms to accent and give height and shape to the arrangement." I love the dramatic look of the greenery runner hanging off the edges of the table all the way to the ground - you could also have it simply run the length of the tabletop if you're short on space, money, or greenery!

While I was working with Raquel, she was kind enough to answer a few questions about floral arrangements in general; for a small fall DIY centerpiece, she recommends that you "choose your favorite fall-colored super market blooms. Central Market is a great destination to pick out a wide selection of blooms and colors." She used burgundy roses, yellow and white spray roses, burgundy scabiosa, aussie fern and of course fall leaves (straight from her yard!).
With our extra blooms we created three small floral arrangements to fit into the curves of the garland on the table. Raquel recommends to begin by placing a small amount of floral foam (soak first in water for 20 minutes) into your favorite small vases (I usually skip the foam-oops!); we used small copper containers for this DIY, but you can also get creative- spray painted cans and hollowed out pumpkins can work too.
Helping Raquel assemble these small arrangements was fun and eye-opening because she is so fast! She says to "place your biggest blooms like roses, mums or hydrangeas in first, add smaller blooms like spray roses, then lastly the leaves." She mentioned the importance of rotating your arrangement as you add flowers; "if this will be a centerpiece, your flowers will need to look good from all angles." Who else is guilty of ever having made a gorgeous one-sided floral arrangement?! Her last tip is an important one: "Remember centerpieces need to be small and low during Thanksgiving meal so you have room for your place settings, chargers, water, wine glasses and the food!" Make sure you have room for your plates and that you can see your guests over the top of the flowers!
In my previous post about how to host a friendsgiving, I mentioned that since I wanted an impactful tablescape, I opted to serve the food buffet-style from a different location. These small floral arrangements could also be used to decorate the food table or the drink station if you have leftover blooms.
Our final product was a memorable tablescape that all of the guests enjoyed (especially those who like to document everything on Instagram). Thank you to Raquel, of R. Love Floral, for creating a beautiful centerpiece for my Friendsgiving meal and for sharing some valuable tips on how to create a stunning floral table runner for your next event.
I asked Raquel one last question that everyone always wants to know the secret to: How can I extend the life of my floral arrangement? She said "I can't stress enough to my clients to change the water in your arrangement. First, make sure your arrangement has fresh, clean water filling up the vase. Remove all foliage and leaves that will be below the water line; this will slow down the process of bacteria growing in your vase. I change my water daily or every other day in my arrangements. If you have flower food to add to the water, that will also help extend the arrangement life."
PLACE CARDS
I already know what you're thinking: "Do I HAVE to have place cards?!" Well, no, you don't. However, using place cards can add a personal touch to your table, especially a Thanksgiving table. There's something about seeing your name on paper that makes you feel special and wanted at that event; you weren't an afterthought- you were part of the plan…and that feels good. A successful event is one where guests leave feeling full (stomachs and hearts!) and glad that they attended. I strongly believe that including place cards in a table setting is one way to add to that "full heart" feeling, so I partnered with a sweet and talented new friend, Andrea, calligrapher and owner of Fig & Flourish, to create these unique Friendsgiving place cards. Andrea says that "What will always set your table settings apart from the rest is personalizing!"
When I initially approached Andrea about designing something special for Friendsgiving, she was up for the challenge and asked me a few questions before we both started brainstorming (and browsing Pinterest!). I would encourage you to find local artists/vendors to work with when you are planning events- that way you can meet in person, and you might even find out that you have mutual friends like Andrea and I did! (small world!) When you're thinking about place cards specifically, don't limit yourself to a piece of white card stock, folded in half, with black calligraphy (although those can be beautiful!); try to think outside the box, or seek out inspiration from unlikely sources, like the grocery store!

Unless I have a specific vision for exactly what I want to be done, I like to give artists and creatives free reign over the design of whatever project we are working on and let them showcase their talent. In this case, I wanted some sort of place cards for a fall table, but beyond that I didn't have any specifics that I needed. Andrea ran with the little direction that I gave her and I was delighted when she presented these gorgeous place cards to me. She incorporated beautiful brown pears, watercolors, calligraphy, and gold ink into one eye-catching and unique place card. I could not have been happier with the result and I, as well as my guests, loved how they turned out.
In addition to these brown pear stems, you could also use seasonal items like mini pumpkins or gourds to hold a place card. If you want to DIY a place card, but don't do calligraphy, don't panic! Andrea recommends, "Instead, write out the names in your best cursive and cheat just a little: go back over your cursive and create some thicker lines. The rule is to thicken the down strokes only so that you can achieve that "calligraphy" look of thick and thin lines. Your friends and family will swoon. But more importantly, they will receive something lovely made by you."
Another creative idea from Andrea to make your guests feel special if you can't stand your handwriting is to "consider hand-writing each person a little 'I am thankful for you because...' note discretely tucked away in a pretty envelope that can be on each place setting. No one will see it but them and they will be more focused on the love and thoughtfulness of your words than the sloppy cursive!"
I think it's the highest compliment and it always makes me smile when guests ask if they can take their place cards home with them like they did after Friendsgiving. Thank you to Andrea, of Fig and Flourish, for sharing her creativity with us and making it a meal to remember!